
So you have a Git repository and everything is all set up. What now?
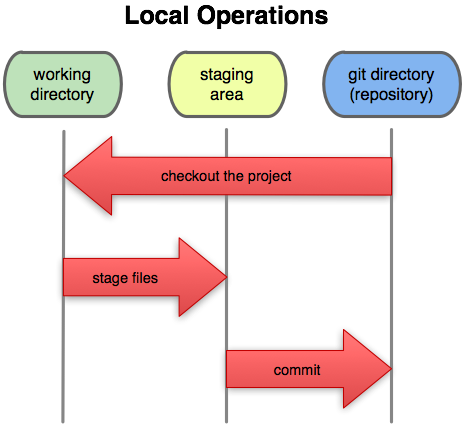
Generally, it is not going to be much different than working with any other source control system, the only real difference should be the staging process. The workflow will generally go something like this:
- synchronize with upstream
- modify files
- see what you’ve changed
- stage the changes you want to commit
- commit your staging area
- rinse, repeat
- push upstream
That is the most complex case - if you’re not collaborating with anyone and so have no upstream repository to push to, and you want to ignore the staging area, it can be as simple as:
- modify files
- commit your changes
- repeat
Easy peasy. Remember, Git is decentralized, so you don’t actually need a public or shared server to commit to - you can use it like RCS if you want and just track local changes. So, let’s look at that use case first, then we’ll do the more complicated one where we have to synchronize our work with other collaborators.
the simple case
The first thing we’re going to do is modify some files. Let’s say we’re working on a simple library that wraps the Git command line in a Ruby library. If you want to follow along, you can clone the project from its GitHub page.
For this first example we’ll modify the README file to add ourselves as an author on the project. So we simply edit the file. Now we want to commit that change, so we run the ‘git commit -a’ command. The ‘-a’ tells Git to stage all modified files and then commit - we’ll cover the ‘staging area’ next, but for now just running ‘git commit -a’ will act something like the ‘commit’ command in SVN.
A prompt for a commit message will open in our editor (the $EDITOR environment variable or ‘core.editor’ git config variable - by default it uses ‘vim’) that looks like this:
_
# Please enter the commit message for your changes. Lines starting
# with '#' will be ignored, and an empty message aborts the commit.
# On branch main
# Changes to be committed:
#   (use "git reset HEAD <file>..." to unstage)
#
# modified:   README
#
~
~
".git/COMMIT_EDITMSG" 9L, 253C
We simply type our commit message and exit the editor.
$ git commit -a
[master]: created 5896d4d: "added myself to the README as an author"
 1 files changed, 2 insertions(+), 1 deletions(-)
Git will show us the commit message we typed and some statistics about what changes were introduced in that commit. It will also give us a checksum of the commit, ‘5896d4d’, that we can use to refer to this exact commit at any other time.
That’s it - that’s the simple case. Edit files, ‘git commit -a’, repeat.
the more complete case
Now we’ll expand that use case a bit to include a remote repository we’re pushing to so we can collaborate with other developers. We’ll also introduce the staging area so we don’t have to commit every file we’ve changed each time we commit.
If you cloned the repository, synchronizing with the upstream repository is pretty easy - just run ‘git pull’. If there have not been any changes by other developers, you’ll just get something like this:
Otherwise it will pull down any changes that have been pushed to the server since the last time you pulled, and Git will merge in the new changes.
$ git pull
Updating c264051..b04dc3d
Fast forward
 lib/simplegit.rb |    4 ++++
 1 files changed, 4 insertions(+), 0 deletions(-)
Now you can update your files like we did in the previous section. However, now let’s imagine that we wanted to commit the changes we’ve made in two separate commits. We can see what has been changed in our working directory by using the ‘git status’ command.
$ git status
# On branch master
# Changed but not updated:
#   (use "git add <file>..." to update what will be committed)
#   (use "git checkout -- <file>..." to discard changes in working directory)
#
#	modified:   README
#	modified:   lib/simplegit.rb
#
no changes added to commit (use "git add" and/or "git commit -a")
We can see that we have two files in the ‘Changed but not updated’ section, which means that they are unstaged. That is, if we commit right now, nothing will happen. You have to stage a file before you can commit it.
So, let’s stage the files. Git uses the ‘git add’ command both to begin tracking files and also to stage changes to them. So let’s stage the changes in just the README file, then take a look at our status again.
$ git add README
$ git status
# On branch master
# Changes to be committed:
#   (use "git reset HEAD <file>..." to unstage)
#
#	modified:   README
#
# Changed but not updated:
#   (use "git add <file>..." to update what will be committed)
#   (use "git checkout -- <file>..." to discard changes in working directory)
#
#	modified:   lib/simplegit.rb
Now the ‘lib/simplegit.rb’ file is still unstaged, but the README file is now under the ‘Changes to be committed’ section - it is staged. Now if we run the commit command (without the -a, which automatically stages everything), only the changes to that file will go into the commit - the simplegit.rb file will remain unstaged. In this instance, we’ll use the ‘-m’ option to ‘git commit’ to specify the commit message on the command line.
$ git commit -m 'updated the README'
[master]: created 14bb3c6: "updated the README"
 1 files changed, 1 insertions(+), 2 deletions(-)
Now if we run ‘git status’ again, we can see that the staged file is now committed and all we have left is the unstaged ‘simplegit.rb’ file.
$ git status
# On branch master
# Your branch is ahead of 'origin/master' by 1 commit.
#
# Changed but not updated:
#   (use "git add <file>..." to update what will be committed)
#   (use "git checkout -- <file>..." to discard changes in working directory)
#
#	modified:   lib/simplegit.rb
#
Now we can stage and commit that file into a second commit:
$ git commit -a -m 'added a staging command to the library'
[master]: created bbaee85: "added a staging command to the library"
 1 files changed, 4 insertions(+), 0 deletions(-)
$ git status
# On branch master
# Your branch is ahead of 'origin/master' by 2 commits.
#
nothing to commit (working directory clean)
Now we have all our changes stored in two commits thematically, so that it can be easier for our collaborators to understand what we’ve been working on. After the last file is committed, we can see that the ‘git status’ command tells us that our working directory is clean (and also that our current branch has two commits that we haven’t pushed yet).
So, now let’s share those changes with our friends by pushing to the server, assuming that we have push access. If we don’t have push access, we can always create our own repository that we do have push access to, push to that and have our friends pull from that.
Running ‘git push’ will push our changes up to the server.
$ git push
Counting objects: 11, done.
Compressing objects: 100% (6/6), done.
Writing objects: 100% (7/7), 744 bytes, done.
Total 7 (delta 3), reused 0 (delta 0)
To git@github.com:schacon/simplegit.git
   b04dc3d..bbaee85  master -> master
Now we can see that all the new data has been pushed up and the master branch on the server has been updated. Now we can repeat this whole process, allowing us to contribute in a basic manner to any Git based project.